Syllabi Central is a University site for managing course syllabi. It is accessible by instructors, WUCRSL users, and Deans.
Go to the Site: https://acadinfo.wustl.edu/syllabus and log in with your WUSTL Key.
Depending on your designation, “Instructor“, “WUCRSL User“, or “Dean” (or overlapping roles), your view will be tailored to your needs when you first log in.
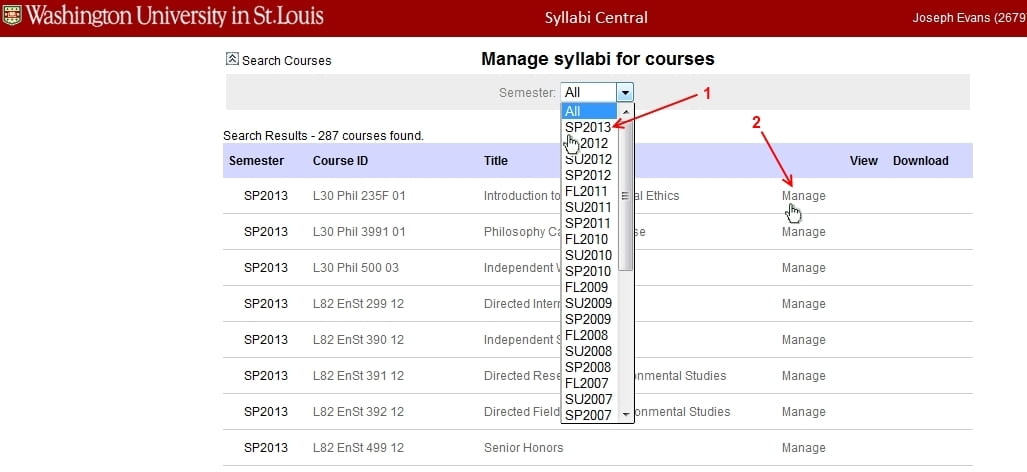
Instructor View
The instructor view (seen below) will show the sections in which you are faculty, Teaching Assistant, or course support. By default you will see the sections you have been associated with over the last 10 years or so with the most recent on top. You have the option of using a semester filter to restrict this view. Independent Studies, Internships and courses over the 500 level are not included.
- To Change Semester, click on the drop-down list of semesters. You can select a specific semester or “All”
- To add or edit a Syllabus, click on the “Manage” text link (See Uploading/Managing Your Syllabus below).
Other actions:
- To view an uploaded Syllabus, click on the View icon to the right of the “Manage” link.
- To download a Syllabus, click on the Download icon.
- To delete a Syllabus, click on the delete icon.
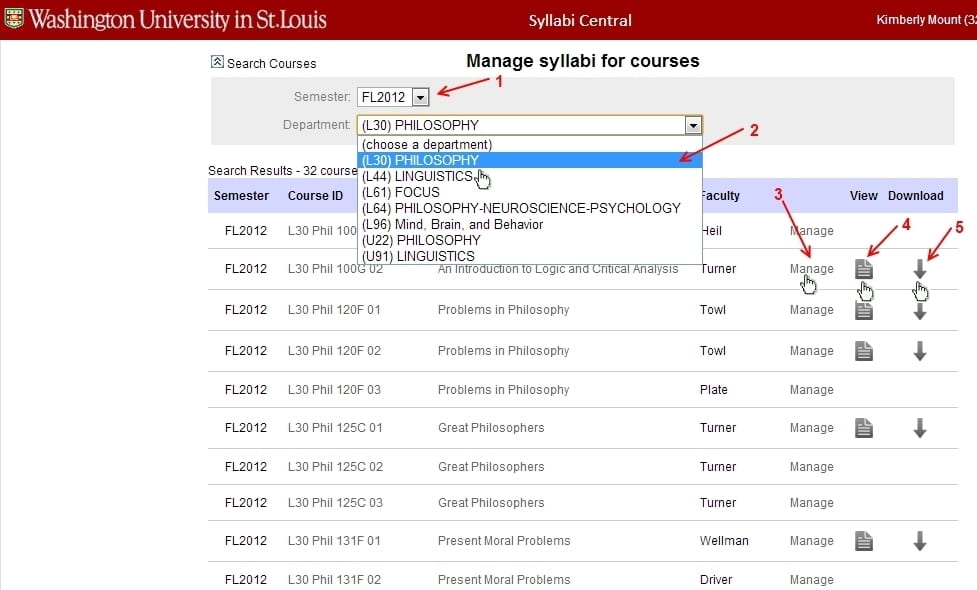
WUCRSL (Course Manager) View
In the WUCRSL-User View (seen below), you have two filtering options based on your security and responsibilities to search, view and manage the Syllabi under your purview.
- First, select the Semester that the course is in where you are to manage its Syllabus.
- Next, select the Department the course you are looking for is in.
- To manage a Syllabus, click on the “Manage” text link (See Uploading/Managing Your Syllabus below for the next step in uploading/downloading/changing your syllabus for a course).
- If there is a Page/Document icon, it means there is a current Syllabus uploaded, you can click this to view that Syllabus
- If there is a current Syllabus uploaded, there will be a Download icon here, and clicking it will start the download process for you to save your Syllabus locally.
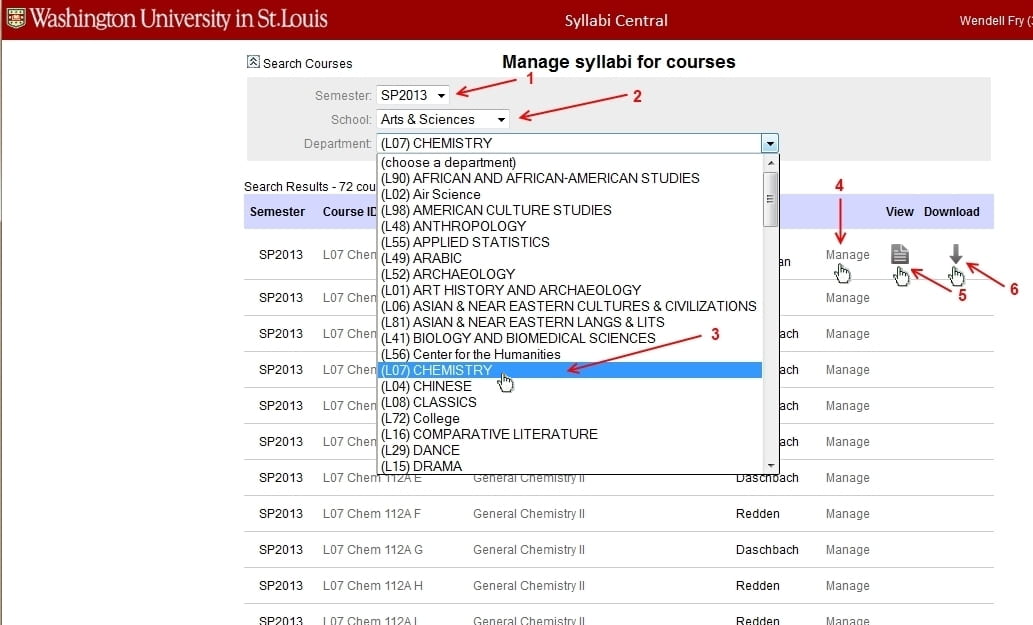
Dean-Level View
In the Dean-Level View (seen below), you have three filtering options based on your security and responsibilities to search, view and manage the Syllabi under your purview.
- First, select the Semester that the course is in where you are to manage its Syllabus.
- Next, select the School that the Department containing the course is in.
- Next, select the Department the course you are looking for is in.
- To manage a Syllabus, click on the “Manage” text link (See Uploading/Managing Your Syllabus for the next step in uploading/downloading/changing your syllabus for a course).
- If there is a Page/Document icon, it means there is a current Syllabus uploaded, you can click this to view that Syllabus
- If there is a current Syllabus uploaded, there will be a Download icon here, and clicking it will start the download process for you to save your Syllabus locally.
Uploading/Managing Your Syllabus
It is recommended that your Syllabus be a pdf file-type. In Word, you can do a Save As and in the next window under the File name: field is the Save as type: field. Press the down arrow next to the Save as type: field, and select PDF (*.pdf) and then save it in the folder you wish.
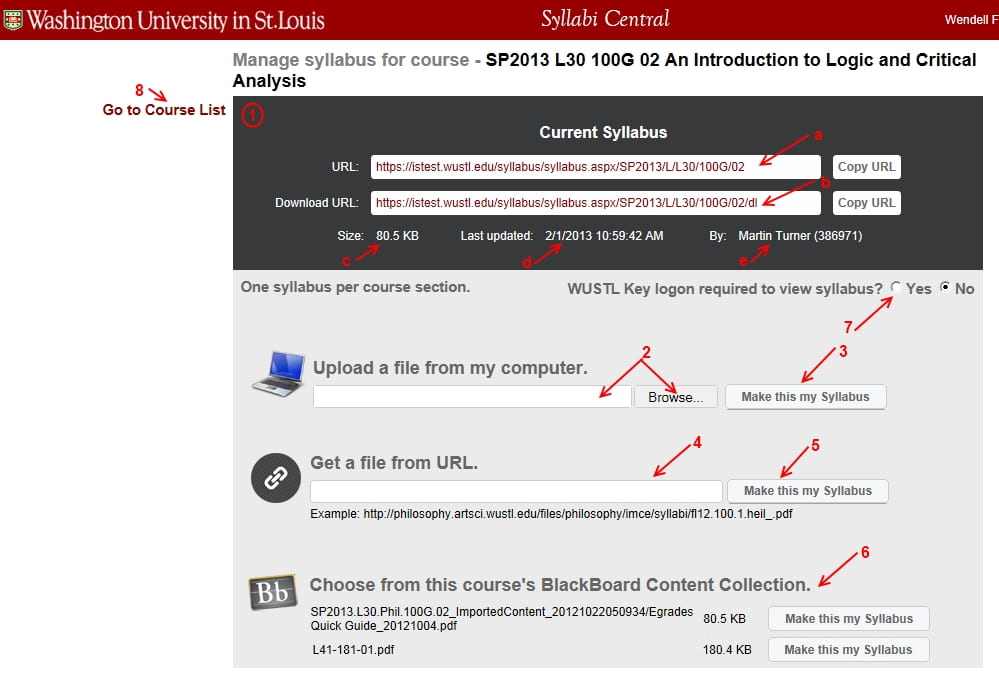
After clicking the Manage link on your desired Syllabus, if you do not have a Current Syllabus the dark upper section of the next page will be collapsed, reading: 600px. If there is a Current Syllabus, the page will have (see image below):
- The Current Syllabus
- URL link. The “Copy URL” button/link to the right will copy the URL to paste into a web address bar. Clicking on the URL itself will open a new tab and display the Syllabus there.
- Download URL link. The “Copy URL” button/link to the right will copy the download URL to paste into a web address bar. clicking on the URL itself will download the Syllabus referred to.
- The Size.
- The Last Updated Date and Time.
- Who the Syllabus was updated By last.
- To Upload a file from my computer, click in the open field or on the Browse button, and navigate to that file’s location on your PC, or on your Network folder.
- Once selected and you want to make this your Syllabus, please click the Make this my Syllabus button to the right.
- If you have the Syllabus at a particular URL, then put the URL in the field under Get a file from URL.
- Click the Make this my Syllabus button for that URL to use the Syllabus that is at that location.
- You can also select your Syllabus from the options below in the Blackboard Content Collection area for the course. Click the Make this my Syllabus button next to the chosen file in your content collection.
- You may also select to have a WUSTL Key logon required to access your Syllabus.
- Click the Go to Course List link to go back to the Course List page without doing anything further.